The Container Network Model
- Objectives
- The Container Network Model
- What's in a network?
- Network implementation details
- Differences with the CNI
- Single container in a Docker network
- Two containers on a single Docker network
- Two containers on two Docker networks
- Creating a network
- Placing containers on a network
- Communication between containers
- Resolving container addresses
- Running the web server
- Test the web server
- Start the data store
- Test the web server again
- A few words on scope
- Using a network alias instead of a name
- Names are local to each network
- Network aliases
- Creating containers on another network
- Resolving network aliases
- Connecting to aliased containers
- Good to know ...
- A few words about round robin DNS
- Custom networks
- Setting containers' IP address
- Overlay networks
- Multi-host networking (overlay)
- Multi-host networking (plugins)
- Connecting and disconnecting dynamically
- Dynamically connecting to a network
- Finding the container ID and connecting it
- Checking what we did
- Looking at the network setup in the container
- Disconnecting from a network
- Network aliases are scoped per network
- Finding out about our networks and names

Objectives
We will learn about the CNM (Container Network Model).
At the end of this lesson, you will be able to:
Create a private network for a group of containers.
Use container naming to connect services together.
Dynamically connect and disconnect containers to networks.
Set the IP address of a container.
We will also explain the principle of overlay networks and network plugins.
The Container Network Model
The CNM was introduced in Engine 1.9.0 (November 2015).
The CNM adds the notion of a network, and a new top-level command to manipulate and see those networks: docker network.
$ docker network ls
NETWORK ID          NAME                DRIVER
6bde79dfcf70        bridge              bridge
8d9c78725538        none                null
eb0eeab782f4        host                host
4c1ff84d6d3f        blog-dev            overlay
228a4355d548        blog-prod           overlay
What's in a network?
Conceptually, a network is a virtual switch.
It can be local (to a single Engine) or global (spanning multiple hosts).
A network has an IP subnet associated to it.
Docker will allocate IP addresses to the containers connected to a network.
Containers can be connected to multiple networks.
Containers can be given per-network names and aliases.
The names and aliases can be resolved via an embedded DNS server.
Network implementation details
A network is managed by a driver.
The built-in drivers include:
bridge(default)nonehostmacvlan
A multi-host driver, overlay, is available out of the box (for Swarm clusters).
More drivers can be provided by plugins (OVS, VLAN...)
A network can have a custom IPAM (IP allocator).
Differences with the CNI
CNI = Container Network Interface
CNI is used notably by Kubernetes
With CNI, all the nodes and containers are on a single IP network
Both CNI and CNM offer the same functionality, but with very different methods
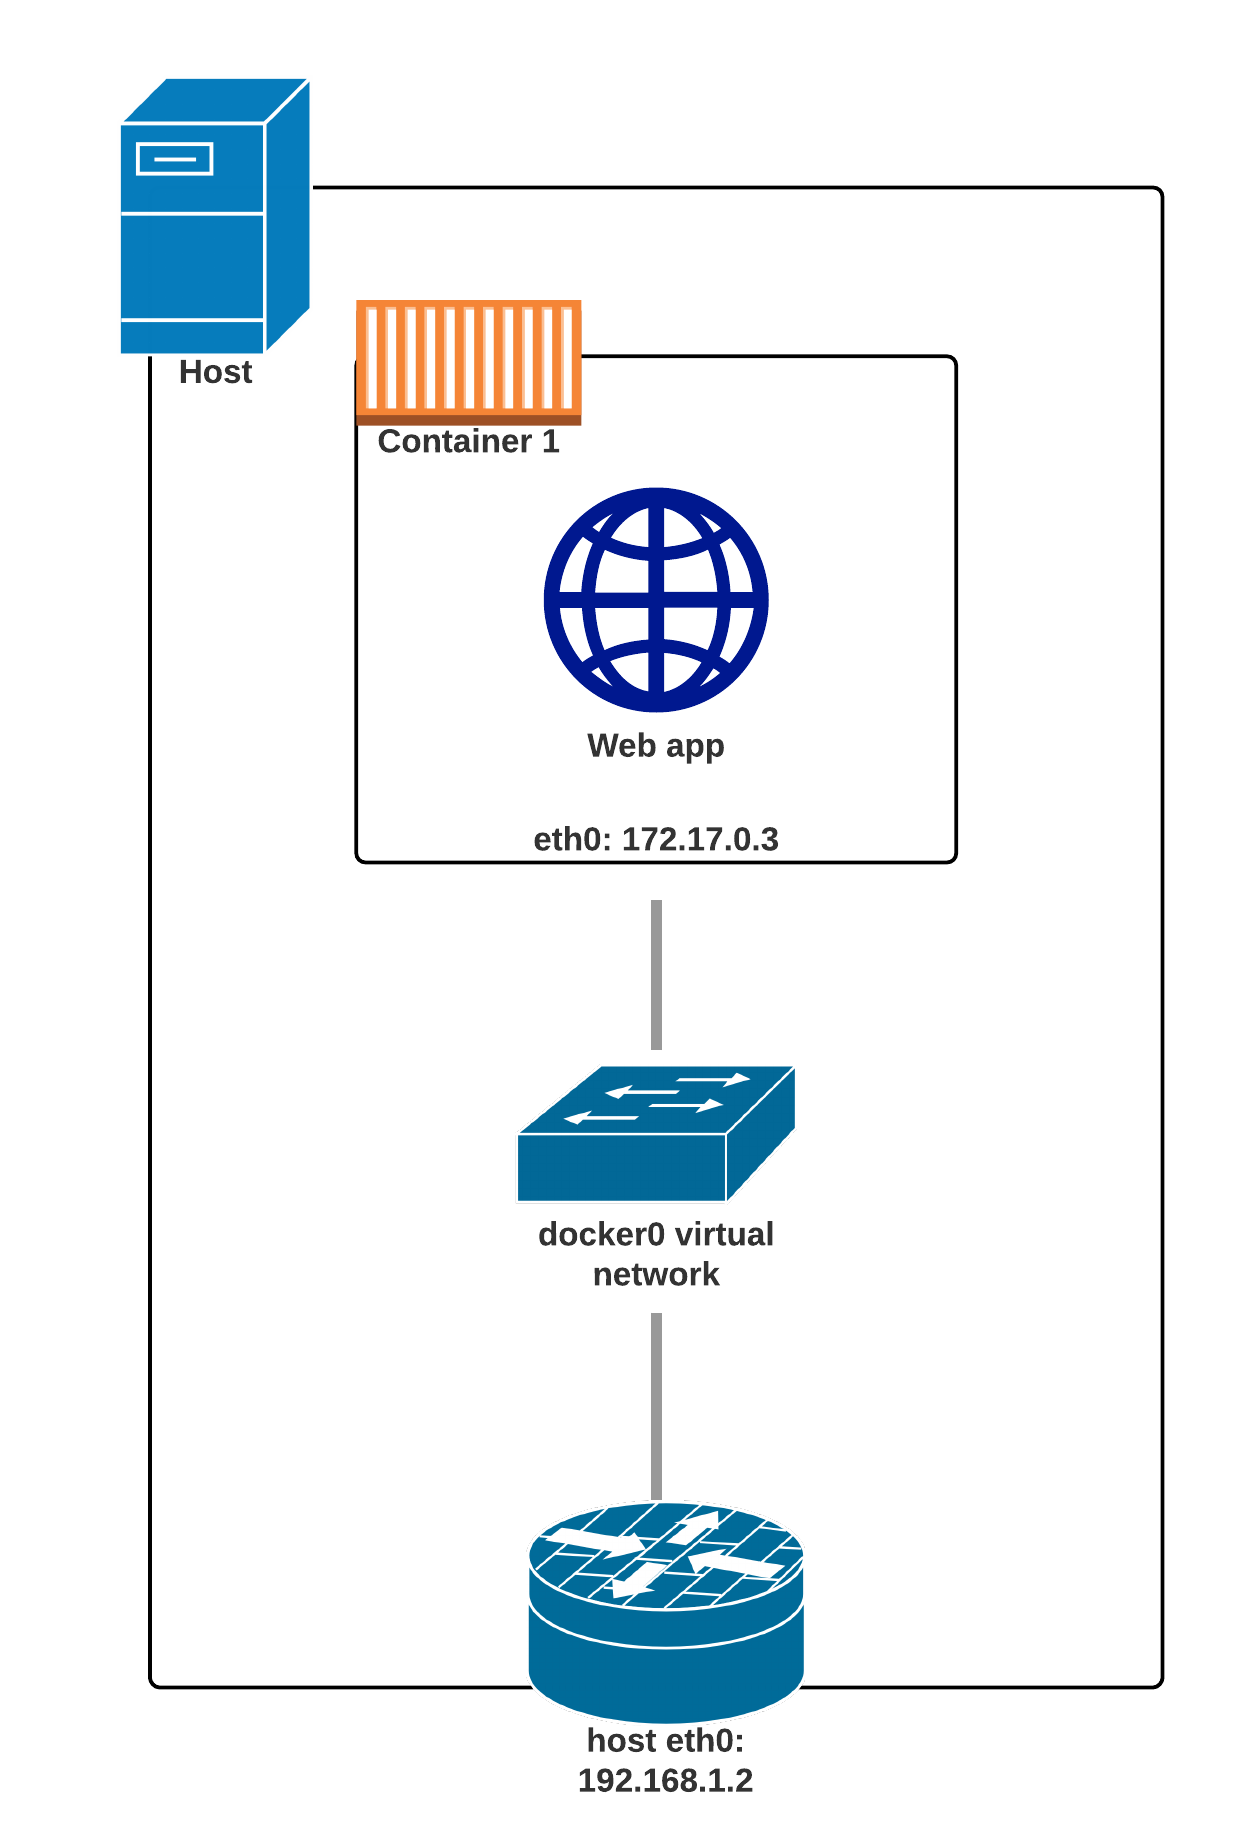
Single container in a Docker network
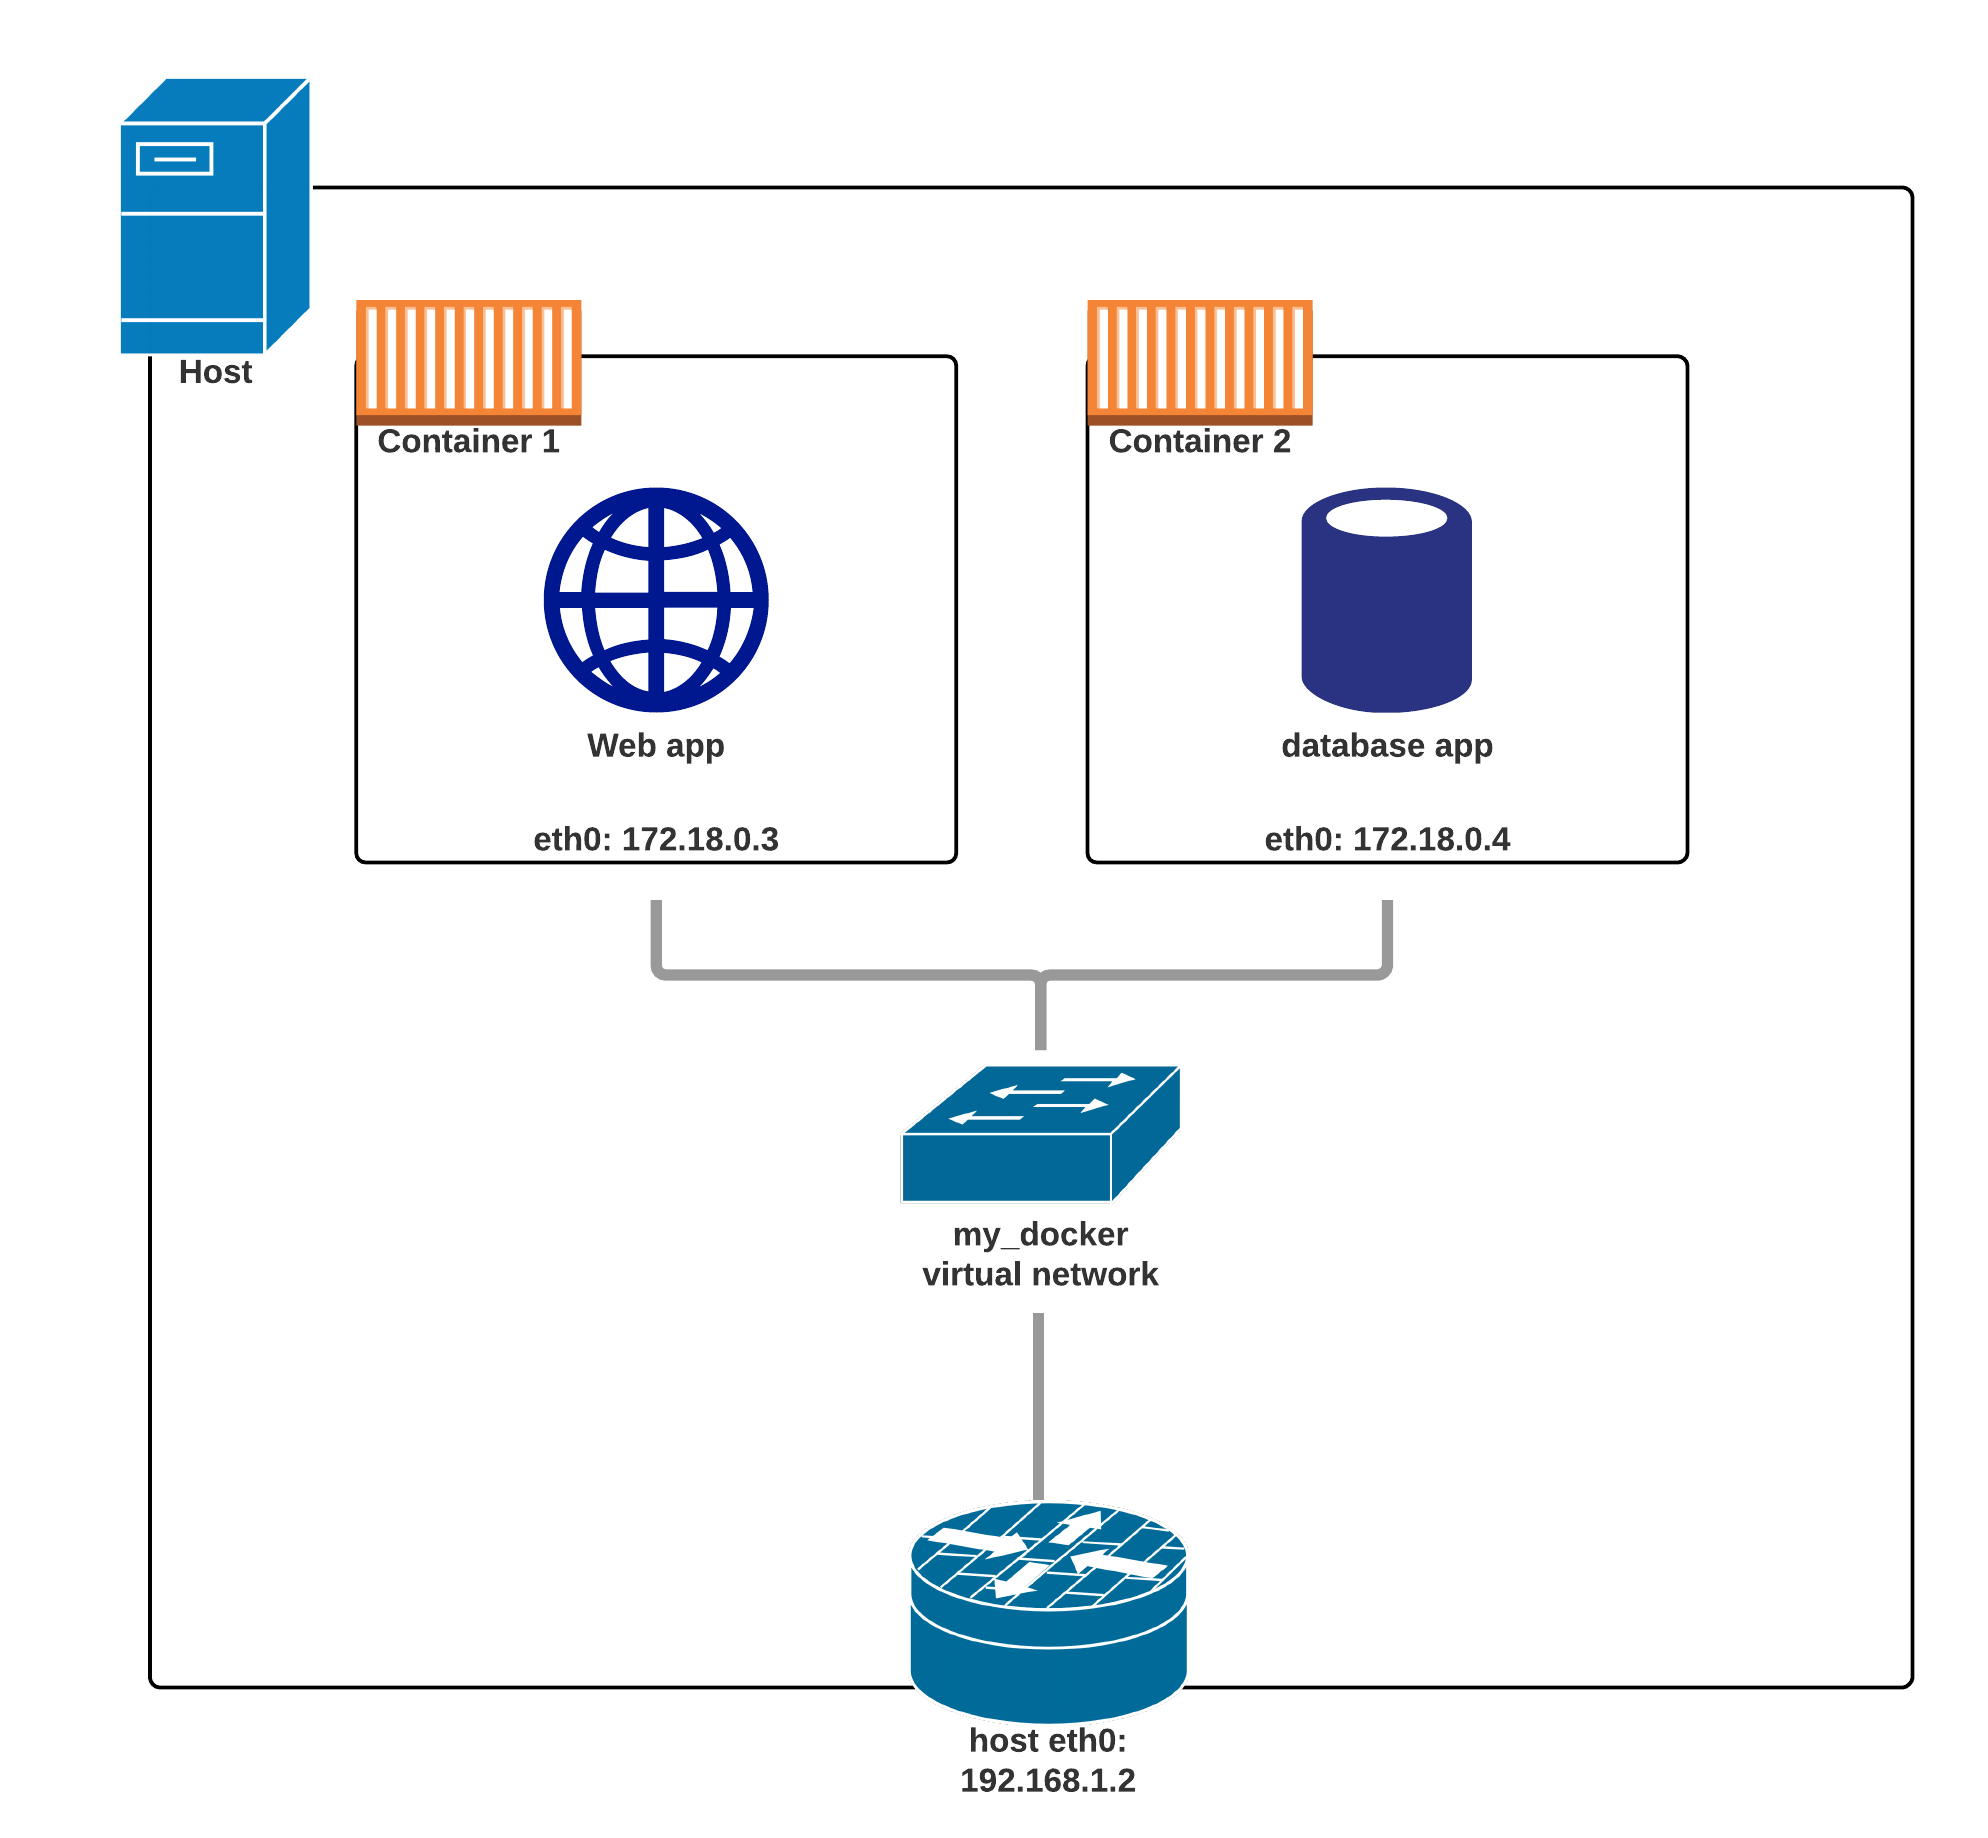
Two containers on a single Docker network
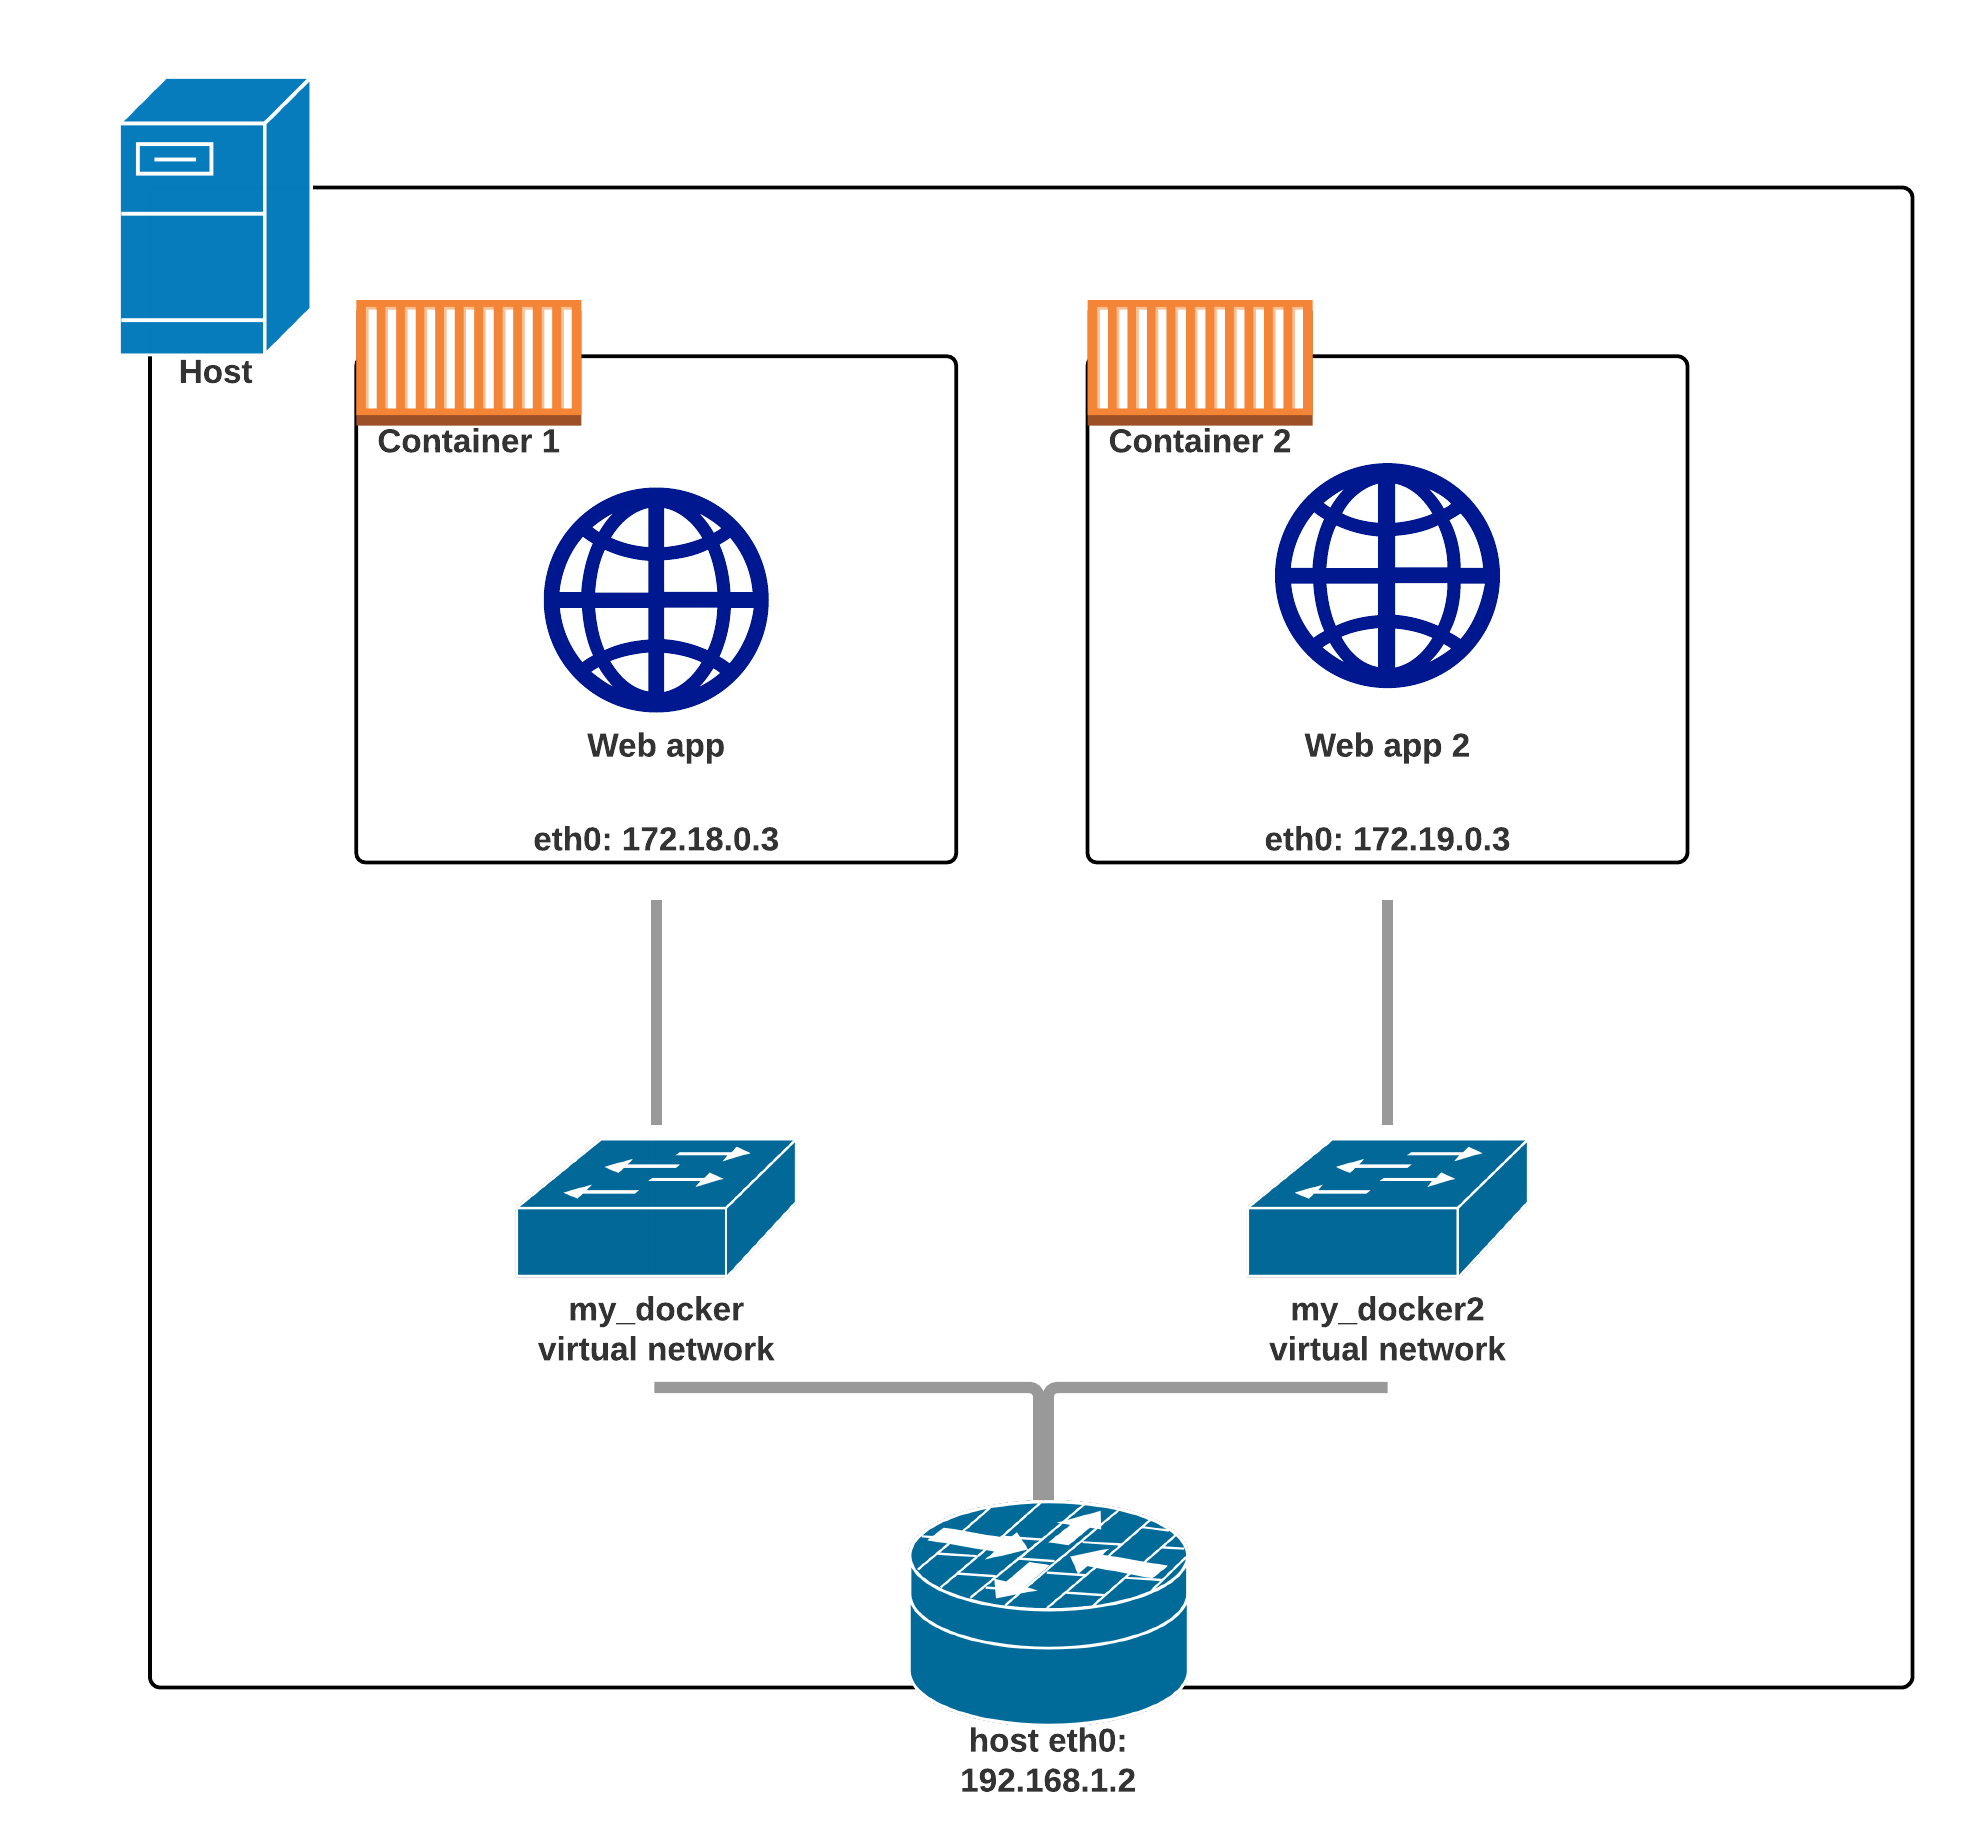
Two containers on two Docker networks
Creating a network
Let's create a network called dev.
$ docker network create dev
4c1ff84d6d3f1733d3e233ee039cac276f425a9d5228a4355d54878293a889ba
The network is now visible with the network ls command:
$ docker network ls
NETWORK ID          NAME                DRIVER
6bde79dfcf70        bridge              bridge
8d9c78725538        none                null
eb0eeab782f4        host                host
4c1ff84d6d3f        dev                 bridge
Placing containers on a network
We will create a named container on this network.
It will be reachable with its name, es.
$ docker run -d --name es --net dev elasticsearch:2
8abb80e229ce8926c7223beb69699f5f34d6f1d438bfc5682db893e798046863
Communication between containers
Now, create another container on this network.
$ docker run -ti --net dev alpine sh
root@0ecccdfa45ef:/#
From this new container, we can resolve and ping the other one, using its assigned name:
/ # ping es
PING es (172.18.0.2) 56(84) bytes of data.
64 bytes from es.dev (172.18.0.2): icmp_seq=1 ttl=64 time=0.221 ms
64 bytes from es.dev (172.18.0.2): icmp_seq=2 ttl=64 time=0.114 ms
64 bytes from es.dev (172.18.0.2): icmp_seq=3 ttl=64 time=0.114 ms
^C
--- es ping statistics ---
3 packets transmitted, 3 received, 0% packet loss, time 2000ms
rtt min/avg/max/mdev = 0.114/0.149/0.221/0.052 ms
root@0ecccdfa45ef:/#
Resolving container addresses
In Docker Engine 1.9, name resolution is implemented with /etc/hosts, and
updating it each time containers are added/removed.
[root@0ecccdfa45ef /]# cat /etc/hosts
172.18.0.3  0ecccdfa45ef
127.0.0.1       localhost
::1     localhost ip6-localhost ip6-loopback
fe00::0 ip6-localnet
ff00::0 ip6-mcastprefix
ff02::1 ip6-allnodes
ff02::2 ip6-allrouters
172.18.0.2      es
172.18.0.2      es.dev
In Docker Engine 1.10, this has been replaced by a dynamic resolver.
(This avoids race conditions when updating /etc/hosts.)
Service discovery with containers
Let's try to run an application that requires two containers.
The first container is a web server.
The other one is a redis data store.
We will place them both on the
devnetwork created before.
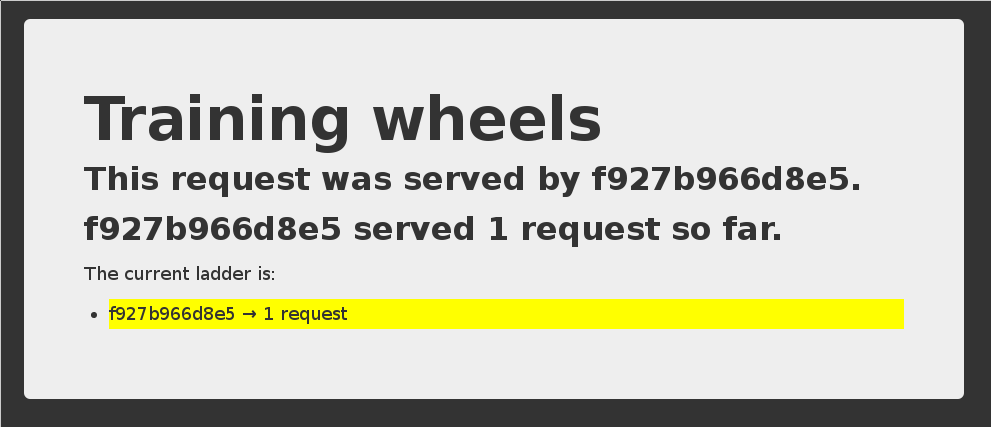
Running the web server
The application is provided by the container image
jpetazzo/trainingwheels.We don't know much about it so we will try to run it and see what happens!
Start the container, exposing all its ports:
$ docker run --net dev -d -P jpetazzo/trainingwheels
Check the port that has been allocated to it:
$ docker ps -l
Test the web server
- If we connect to the application now, we will see an error page:
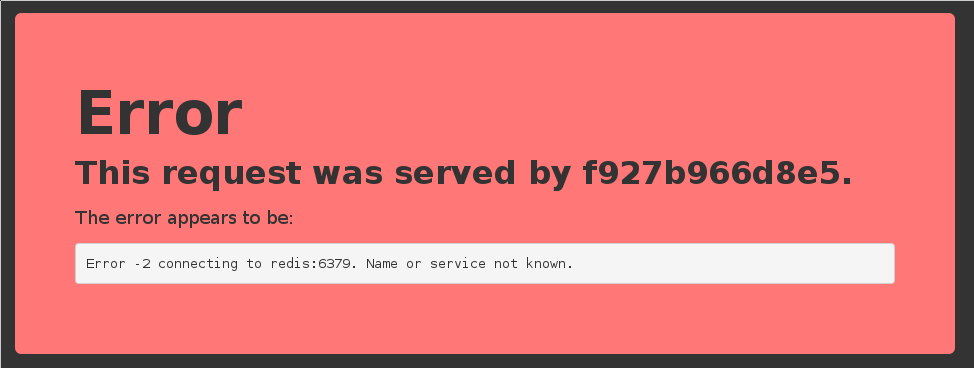
- This is because the Redis service is not running.
- This container tries to resolve the name
redis.
Note: we're not using a FQDN or an IP address here; just redis.
Start the data store
We need to start a Redis container.
That container must be on the same network as the web server.
It must have the right name (
redis) so the application can find it.
Start the container:
$ docker run --net dev --name redis -d redis
Test the web server again
- If we connect to the application now, we should see that the app is working correctly:
- When the app tries to resolve
redis, instead of getting a DNS error, it gets the IP address of our Redis container.
A few words on scope
What if we want to run multiple copies of our application?
Since names are unique, there can be only one container named
redisat a time.However, we can specify the network name of our container with
--net-alias.--net-aliasis scoped per network, and independent from the container name.
Using a network alias instead of a name
Let's remove the redis container:
$ docker rm -f redis
And create one that doesn't block the redis name:
$ docker run --net dev --net-alias redis -d redis
Check that the app still works (but the counter is back to 1, since we wiped out the old Redis container).
Names are local to each network
Let's try to ping our es container from another container, when that other container is not on the dev network.
$ docker run --rm alpine ping es
ping: bad address 'es'
Names can be resolved only when containers are on the same network.
Containers can contact each other only when they are on the same network (you can try to ping using the IP address to verify).
Network aliases
We would like to have another network, prod, with its own es container. But there can be only one container named es!
We will use network aliases.
A container can have multiple network aliases.
Network aliases are local to a given network (only exist in this network).
Multiple containers can have the same network alias (even on the same network). In Docker Engine 1.11, resolving a network alias yields the IP addresses of all containers holding this alias.
Creating containers on another network
Create the prod network.
$ docker network create prod
5a41562fecf2d8f115bedc16865f7336232a04268bdf2bd816aecca01b68d50c
We can now create multiple containers with the es alias on the new prod network.
$ docker run -d --name prod-es-1 --net-alias es --net prod elasticsearch:2
38079d21caf0c5533a391700d9e9e920724e89200083df73211081c8a356d771
$ docker run -d --name prod-es-2 --net-alias es --net prod elasticsearch:2
1820087a9c600f43159688050dcc164c298183e1d2e62d5694fd46b10ac3bc3d
Resolving network aliases
Let's try DNS resolution first, using the nslookup tool that ships with the alpine image.
$ docker run --net prod --rm alpine nslookup es
Name:      es
Address 1: 172.23.0.3 prod-es-2.prod
Address 2: 172.23.0.2 prod-es-1.prod
(You can ignore the can't resolve '(null)' errors.)
Connecting to aliased containers
Each ElasticSearch instance has a name (generated when it is started). This name can be seen when we issue a simple HTTP request on the ElasticSearch API endpoint.
Try the following command a few times:
$ docker run --rm --net dev centos curl -s es:9200
{
  "name" : "Tarot",
...
}
Then try it a few times by replacing --net dev with --net prod:
$ docker run --rm --net prod centos curl -s es:9200
{
  "name" : "The Symbiote",
...
}
Good to know ...
Docker will not create network names and aliases on the default
bridgenetwork.Therefore, if you want to use those features, you have to create a custom network first.
Network aliases are not unique on a given network.
i.e., multiple containers can have the same alias on the same network.
In that scenario, the Docker DNS server will return multiple records.
(i.e. you will get DNS round robin out of the box.)Enabling Swarm Mode gives access to clustering and load balancing with IPVS.
Creation of networks and network aliases is generally automated with tools like Compose.
A few words about round robin DNS
Don't rely exclusively on round robin DNS to achieve load balancing.
Many factors can affect DNS resolution, and you might see:
- all traffic going to a single instance;
- traffic being split (unevenly) between some instances;
- different behavior depending on your application language;
- different behavior depending on your base distro;
- different behavior depending on other factors (sic).
It's OK to use DNS to discover available endpoints, but remember that you have to re-resolve every now and then to discover new endpoints.
Custom networks
When creating a network, extra options can be provided.
--internaldisables outbound traffic (the network won't have a default gateway).--gatewayindicates which address to use for the gateway (when outbound traffic is allowed).--subnet(in CIDR notation) indicates the subnet to use.--ip-range(in CIDR notation) indicates the subnet to allocate from.--aux-addressallows to specify a list of reserved addresses (which won't be allocated to containers).
Setting containers' IP address
- It is possible to set a container's address with
--ip. - The IP address has to be within the subnet used for the container.
A full example would look like this.
$ docker network create --subnet 10.66.0.0/16 pubnet
42fb16ec412383db6289a3e39c3c0224f395d7f85bcb1859b279e7a564d4e135
$ docker run --net pubnet --ip 10.66.66.66 -d nginx
b2887adeb5578a01fd9c55c435cad56bbbe802350711d2743691f95743680b09
Note: don't hard code container IP addresses in your code!
I repeat: don't hard code container IP addresses in your code!
Overlay networks
The features we've seen so far only work when all containers are on a single host.
If containers span multiple hosts, we need an overlay network to connect them together.
Docker ships with a default network plugin,
overlay, implementing an overlay network leveraging VXLAN, enabled with Swarm Mode.Other plugins (Weave, Calico...) can provide overlay networks as well.
Once you have an overlay network, all the features that we've used in this chapter work identically across multiple hosts.
Multi-host networking (overlay)
Out of the scope for this intro-level workshop!
Very short instructions:
- enable Swarm Mode (
docker swarm initthendocker swarm joinon other nodes) docker network create mynet --driver overlaydocker service create --network mynet myimage
See https://jpetazzo.github.io/container.training for all the deets about clustering!
Multi-host networking (plugins)
Out of the scope for this intro-level workshop!
General idea:
install the plugin (they often ship within containers)
run the plugin (if it's in a container, it will often require extra parameters; don't just
docker runit blindly!)some plugins require configuration or activation (creating a special file that tells Docker "use the plugin whose control socket is at the following location")
you can then
docker network create --driver pluginname
Connecting and disconnecting dynamically
So far, we have specified which network to use when starting the container.
The Docker Engine also allows to connect and disconnect while the container runs.
This feature is exposed through the Docker API, and through two Docker CLI commands:
docker network connect <network> <container>docker network disconnect <network> <container>
Dynamically connecting to a network
We have a container named
esconnected to a network nameddev.Let's start a simple alpine container on the default network:
$ docker run -ti alpine sh
/ #
In this container, try to ping the
escontainer:/ # ping es ping: bad address 'es'This doesn't work, but we will change that by connecting the container.
Finding the container ID and connecting it
Figure out the ID of our alpine container; here are two methods:
looking at
/etc/hostnamein the container,running
docker ps -lqon the host.
Run the following command on the host:
$ docker network connect dev `<container_id>`
Checking what we did
Try again to
ping esfrom the container.It should now work correctly:
/ # ping es
PING es (172.20.0.3): 56 data bytes
64 bytes from 172.20.0.3: seq=0 ttl=64 time=0.376 ms
64 bytes from 172.20.0.3: seq=1 ttl=64 time=0.130 ms
^C
Interrupt it with Ctrl-C.
Looking at the network setup in the container
We can look at the list of network interfaces with ifconfig, ip a, or ip l:
/ # ip a
1: lo: <LOOPBACK,UP,LOWER_UP> mtu 65536 qdisc noqueue state UNKNOWN qlen 1000
    link/loopback 00:00:00:00:00:00 brd 00:00:00:00:00:00
    inet 127.0.0.1/8 scope host lo
       valid_lft forever preferred_lft forever
18: eth0@if19: <BROADCAST,MULTICAST,UP,LOWER_UP,M-DOWN> mtu 1500 qdisc noqueue state UP
    link/ether 02:42:ac:11:00:02 brd ff:ff:ff:ff:ff:ff
    inet 172.17.0.2/16 brd 172.17.255.255 scope global eth0
       valid_lft forever preferred_lft forever
20: eth1@if21: <BROADCAST,MULTICAST,UP,LOWER_UP,M-DOWN> mtu 1500 qdisc noqueue state UP
    link/ether 02:42:ac:14:00:04 brd ff:ff:ff:ff:ff:ff
    inet 172.20.0.4/16 brd 172.20.255.255 scope global eth1
       valid_lft forever preferred_lft forever
/ #
Each network connection is materialized with a virtual network interface.
As we can see, we can be connected to multiple networks at the same time.
Disconnecting from a network
Let's try the symmetrical command to disconnect the container:
$ docker network disconnect dev <container_id>From now on, if we try to ping
es, it will not resolve:/ # ping es ping: bad address 'es'Trying to ping the IP address directly won't work either:
/ # ping 172.20.0.3
... (nothing happens until we interrupt it with Ctrl-C)
Network aliases are scoped per network
Each network has its own set of network aliases.
We saw this earlier:
esresolves to different addresses indevandprod.If we are connected to multiple networks, the resolver looks up names in each of them (as of Docker Engine 18.03, it is the connection order) and stops as soon as the name is found.
Therefore, if we are connected to both
devandprod, resolvingeswill not give us the addresses of all theesservices; but only the ones indevorprod.However, we can lookup
es.devores.prodif we need to.
Finding out about our networks and names
We can do reverse DNS lookups on containers' IP addresses.
If the IP address belongs to a network (other than the default bridge), the result will be:
name-or-first-alias-or-container-id.network-nameExample:
$ docker run -ti --net prod --net-alias hello alpine
/ # apk add --no-cache drill
...
OK: 5 MiB in 13 packages
/ # ifconfig
eth0      Link encap:Ethernet  HWaddr 02:42:AC:15:00:03
          inet addr:`172.21.0.3`  Bcast:172.21.255.255  Mask:255.255.0.0
          UP BROADCAST RUNNING MULTICAST  MTU:1500  Metric:1
...
/ # drill -t ptr `3.0.21.172`.in-addr.arpa
...
;; ANSWER SECTION:
3.0.21.172.in-addr.arpa.    600    IN    PTR    `hello.prod`.
...