Local development workflow with Docker
- Objectives
- Local development in a container
- Working on the "namer" application
- Looking at the code
- Looking at the
Dockerfile - Building and running the "namer" application
- Connecting to our application
- Making changes to the code
- Our first volume
- Mounting volumes inside containers
- Testing the development container
- Making a change to our application
- Viewing our changes
- Understanding volumes
- Trash your servers and burn your code
- Immutable infrastructure in a nutshell
- Recap of the development workflow
- Debugging inside the container
docker execexample- Stopping the container
- Section summary
Objectives
At the end of this section, you will be able to:
Share code between container and host.
Use a simple local development workflow.
Local development in a container
We want to solve the following issues:
"Works on my machine"
"Not the same version"
"Missing dependency"
By using Docker containers, we will get a consistent development environment.
Working on the "namer" application
We have to work on some application whose code is at:
What is it? We don't know yet!
Let's download the code.
$ git clone https://github.com/jpetazzo/namer
Looking at the code
$ cd namer
$ ls -1
company_name_generator.rb
config.ru
docker-compose.yml
Dockerfile
Gemfile
Aha, a Gemfile! This is Ruby. Probably. We know this. Maybe?
Looking at the Dockerfile
FROM ruby

COPY . /src
WORKDIR /src
RUN bundler install

CMD ["rackup", "--host", "0.0.0.0"]
EXPOSE 9292
- This application is using a base
rubyimage. - The code is copied in
/src. - Dependencies are installed with
bundler. - The application is started with
rackup. - It is listening on port 9292.
Building and running the "namer" application
- Let's build the application with the
Dockerfile!
$ docker build -t namer .
- Then run it. We need to expose its ports.
$ docker run -dP namer
- Check on which port the container is listening.
$ docker ps -l
Connecting to our application
Point our browser to our Docker node, on the port allocated to the container.
Hit "reload" a few times.
This is an enterprise-class, carrier-grade, ISO-compliant company name generator!
(With 50% more bullshit than the average competition!)
(Wait, was that 50% more, or 50% less? Anyway!)
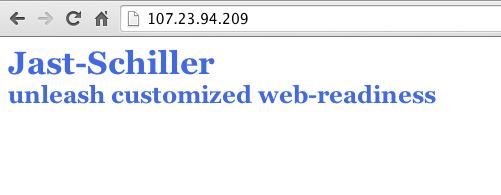
Figure 60 : web application 1
Making changes to the code
Option 1:
- Edit the code locally
- Rebuild the image
- Re-run the container
Option 2:
- Enter the container (with
docker exec) - Install an editor
- Make changes from within the container
Option 3:
- Use a volume to mount local files into the container
- Make changes locally
- Changes are reflected into the container
Our first volume
We will tell Docker to map the current directory to /src in the container.
$ docker run -d -v $(pwd):/src -P namer
-d: the container should run in detached mode (in the background).-v: the following host directory should be mounted inside the container.-P: publish all the ports exposed by this image.nameris the name of the image we will run.We don't specify a command to run because it is already set in the Dockerfile.
Note: on Windows, replace $(pwd) with %cd% (or ${pwd} if you use PowerShell).
Mounting volumes inside containers
The -v flag mounts a directory from your host into your Docker container.
The flag structure is:
[host-path]:[container-path]:[rw|ro]
If
[host-path]or[container-path]doesn't exist it is created.You can control the write status of the volume with the
roandrwoptions.If you don't specify
rworro, it will berwby default.
There will be a full chapter about volumes!
Testing the development container
- Check the port used by our new container.
$ docker ps -l
CONTAINER ID  IMAGE  COMMAND  CREATED        STATUS  PORTS                   NAMES
045885b68bc5  namer  rackup   3 seconds ago  Up ...  0.0.0.0:32770->9292/tcp ...
- Open the application in your web browser.
Making a change to our application
Our customer really doesn't like the color of our text. Let's change it.
$ vi company_name_generator.rb
And change
color: royalblue;
To:
color: red;
Viewing our changes
Reload the application in our browser.
The color should have changed.
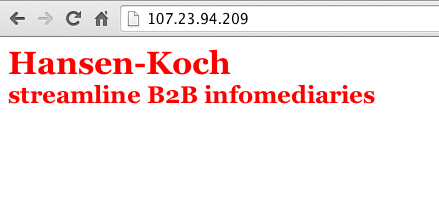
Figure 61 : web application 2
Understanding volumes
Volumes are not copying or synchronizing files between the host and the container.
Volumes are bind mounts: a kernel mechanism associating a path to another.
Bind mounts are kind of similar to symbolic links, but at a very different level.
Changes made on the host or on the container will be visible on the other side.
(Since under the hood, it's the same file on both anyway.)
Trash your servers and burn your code
(This is the title of a 2013 blog post by Chad Fowler, where he explains the concept of immutable infrastructure.)
Let's mess up majorly with our container.
(Remove files or whatever.)
Now, how can we fix this?
Our old container (with the blue version of the code) is still running.
See on which port it is exposed:
docker psPoint our browser to it to confirm that it still works fine.
Immutable infrastructure in a nutshell
Instead of updating a server, we deploy a new one.
This might be challenging with classical servers, but it's trivial with containers.
In fact, with Docker, the most logical workflow is to build a new image and run it.
If something goes wrong with the new image, we can always restart the old one.
We can even keep both versions running side by side.
If this pattern sounds interesting, you might want to read about blue/green deployment and canary deployments.
Recap of the development workflow
Write a Dockerfile to build an image containing our development environment.
(Rails, Django, ... and all the dependencies for our app)Start a container from that image.
Use the-vflag to mount our source code inside the container.Edit the source code outside the containers, using regular tools.
(vim, emacs, textmate...)Test the application.
(Some frameworks pick up changes automatically.
Others require you to Ctrl-C + restart after each modification.)Iterate and repeat steps 3 and 4 until satisfied.
When done, commit+push source code changes.
Debugging inside the container
Docker has a command called docker exec.
It allows users to run a new process in a container which is already running.
If sometimes you find yourself wishing you could SSH into a container: you can use docker exec instead.
You can get a shell prompt inside an existing container this way, or run an arbitrary process for automation.
docker exec example
$ # You can run ruby commands in the area the app is running and more!
$ docker exec -it <yourContainerId> bash
root@5ca27cf74c2e:/opt/namer# irb
irb(main):001:0> [0, 1, 2, 3, 4].map {|x| x ** 2}.compact
=> [0, 1, 4, 9, 16]
irb(main):002:0> exit
Stopping the container
Now that we're done let's stop our container.
$ docker stop <yourContainerID>
And remove it.
$ docker rm <yourContainerID>
Section summary
We've learned how to:
Share code between container and host.
Set our working directory.
Use a simple local development workflow.