Running our first Swarm service
- Checking service logs
- Looking up where our container is running
- Viewing the logs of the container
- Scale our service
- Monitoring deployment progress with
--detach - To
--detachor not to--detach --detachover time--detachin action- Expose a service
- Expose ElasticSearch on its default port
- Tasks lifecycle
- Test our service
- Test the load balancing
- Load balancing results
- Under the hood of the routing mesh
- Managing inbound traffic
- Managing HTTP traffic
- You should use labels
- Pro-tip for ingress traffic management
- Using local networks (
host,macvlan...) - Visualize container placement
- Connect to the visualization webapp
- Why This Is More Important Than You Think
- Terminate our services
How do we run services? Simplified version:
docker run→docker service create
Create a service featuring an Alpine container pinging Google resolvers:
docker service create --name pingpong alpine ping 8.8.8.8Check the result:
docker service ps pingpong
Checking service logs
(New in Docker Engine 17.05)
Just like
docker logsshows the output of a specific local container ......
docker service logsshows the output of all the containers of a specific service
- Check the output of our ping command:
docker service logs pingpong
Flags --follow and --tail are available, as well as a few others.
Note: by default, when a container is destroyed (e.g. when scaling down), its logs are lost.
Looking up where our container is running
- The
docker service pscommand told us where our container was scheduled
Look up the
NODEon which the container is running:docker service ps pingpongIf you use Play-With-Docker, switch to that node's tab, or set
DOCKER_HOSTOtherwise,
sshinto that node or use$(eval docker-machine env node...)
Viewing the logs of the container
See that the container is running and check its ID:
docker psView its logs:
docker logs containerIDGo back to
node1afterwards
Scale our service
- Services can be scaled in a pinch with the
docker service updatecommand
Scale the service to ensure 2 copies per node:
docker service update pingpong --replicas 6Check that we have two containers on the current node:
docker ps
Monitoring deployment progress with --detach
(New in Docker Engine 17.10)
The CLI monitors commands that create/update/delete services
In effect,
--detach=falseis the default- synchronous operation
- the CLI will monitor and display the progress of our request
- it exits only when the operation is complete
- Ctrl-C to detach at anytime
--detach=true- asynchronous operation
- the CLI just submits our request
- it exits as soon as the request is committed into Raft
To --detach or not to --detach
--detach=falsegreat when experimenting, to see what's going on
also great when orchestrating complex deployments
(when you want to wait for a service to be ready before starting another)
--detach=truegreat for independent operations that can be parallelized
great in headless scripts (where nobody's watching anyway)
.warning[--detach=true does not complete faster. It just doesn't wait for completion.]
--detach over time
Docker Engine 17.10 and later: the default is
--detach=falseFrom Docker Engine 17.05 to 17.09: the default is
--detach=truePrior to Docker 17.05:
--detachdoesn't exist(You can watch progress with e.g.
watch docker service ps <serviceID>)
--detach in action
Scale the service to ensure 3 copies per node:
docker service update pingpong --replicas 9 --detach=falseAnd then to 4 copies per node:
docker service update pingpong --replicas 12 --detach=true
Expose a service
Services can be exposed, with two special properties:
the public port is available on every node of the Swarm,
requests coming on the public port are load balanced across all instances.
This is achieved with option
-p/--publish; as an approximation:docker run -p → docker service create -pIf you indicate a single port number, it will be mapped on a port starting at 30000
(vs. 32768 for single container mapping)You can indicate two port numbers to set the public port number
(just like withdocker run -p)
Expose ElasticSearch on its default port
- Create an ElasticSearch service (and give it a name while we're at it):
docker service create --name search --publish 9200:9200 --replicas 5 \
       elasticsearch`:2`
Note: don't forget the :2!
The latest version of the ElasticSearch image won't start without mandatory configuration.
Tasks lifecycle
During the deployment, you will be able to see multiple states:
assigned (the task has been assigned to a specific node)
preparing (this mostly means "pulling the image")
starting
running
When a task is terminated (stopped, killed...) it cannot be restarted
(A replacement task will be created)

Test our service
We mapped port 9200 on the nodes, to port 9200 in the containers
Let's try to reach that port!
- Try the following command:
curl localhost:9200
(If you get Connection refused: congratulations, you are very fast indeed! Just try again.)
ElasticSearch serves a little JSON document with some basic information about this instance; including a randomly-generated super-hero name.
Test the load balancing
- If we repeat our
curlcommand multiple times, we will see different names
- Send 10 requests, and see which instances serve them:
  for N in $(seq 1 10); do
    curl -s localhost:9200 | jq .name
  done
Note: if you don't have jq on your Play-With-Docker instance, just install it:
apk add --no-cache jq
Load balancing results
Traffic is handled by our clusters routing mesh.
Each request is served by one of the instances, in rotation.
Note: if you try to access the service from your browser, you will probably see the same instance name over and over, because your browser (unlike curl) will try to re-use the same connection.
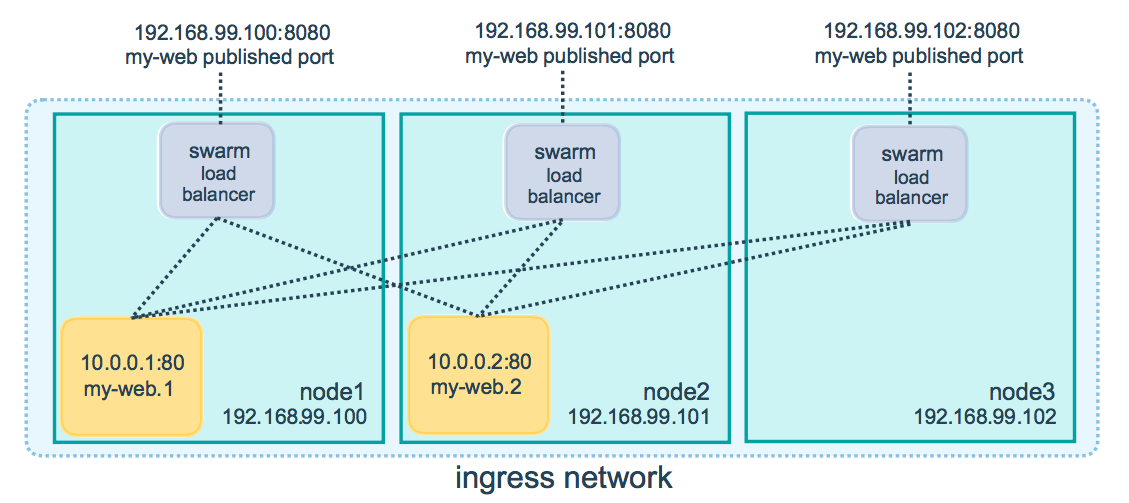
Under the hood of the routing mesh
Load balancing is done by IPVS
IPVS is a high-performance, in-kernel load balancer
It's been around for a long time (merged in the kernel since 2.4)
Each node runs a local load balancer
(Allowing connections to be routed directly to the destination, without extra hops)
Managing inbound traffic
There are many ways to deal with inbound traffic on a Swarm cluster.
Put all (or a subset) of your nodes in a DNS
Arecord (good for web clients)Assign your nodes (or a subset) to an external load balancer (ELB, etc.)
Use a virtual IP and make sure that it is assigned to an "alive" node
etc.
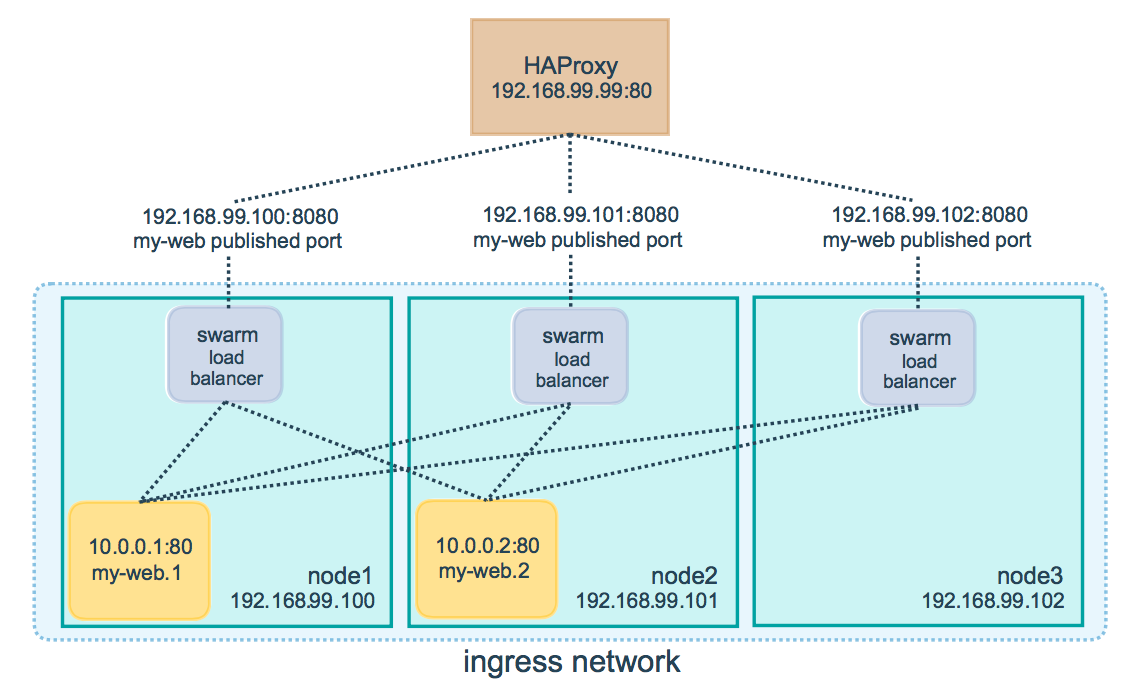
Managing HTTP traffic
The TCP routing mesh doesn't parse HTTP headers
If you want to place multiple HTTP services on port 80/443, you need something more
You can set up NGINX or HAProxy on port 80/443 to route connections to the correct Service, but they need to be "Swarm aware" to dynamically update configs
Docker EE provides its own Layer 7 routing
- Service labels like
com.docker.lb.hosts=<FQDN>are detected automatically via Docker API and dynamically update the configuration
- Service labels like
Two common open source options:
Traefik - popular, many features, requires running on managers, needs key/value for HA
Docker Flow Proxy - uses HAProxy, made for Swarm by Docker Captain @vfarcic
You should use labels
Labels are a great way to attach arbitrary information to services
Examples:
HTTP vhost of a web app or web service
backup schedule for a stateful service
owner of a service (for billing, paging...)
correlate Swarm objects together (services, volumes, configs, secrets, etc.)
Pro-tip for ingress traffic management
It is possible to use local networks with Swarm services
This means that you can do something like this:
docker service create --network host --mode global traefik ...(This runs the
traefikload balancer on each node of your cluster, in thehostnetwork)This gives you native performance (no iptables, no proxy, no nothing!)
The load balancer will "see" the clients' IP addresses
But: a container cannot simultaneously be in the
hostnetwork and another network(You will have to route traffic to containers using exposed ports or UNIX sockets)
Using local networks (host, macvlan ...)
It is possible to connect services to local networks
Using the
hostnetwork is fairly straightforward(With the caveats described on the previous slide)
Other network drivers are a bit more complicated
(IP allocation may have to be coordinated between nodes)
See for instance this guide to get started on
macvlanSee this PR for more information about local network drivers in Swarm mode
Visualize container placement
- Let's leverage the Docker API!
Run this simple-yet-beautiful visualization app:
cd ~/container.training/stacks
docker-compose -f visualizer.yml up -d
Connect to the visualization webapp
- It runs a web server on port 8080
Point your browser to port 8080 of your node1's public ip
(If you use Play-With-Docker, click on the (8080) badge)
The webapp updates the display automatically (you don't need to reload the page)
It only shows Swarm services (not standalone containers)
It shows when nodes go down
It has some glitches (it's not Carrier-Grade Enterprise-Compliant ISO-9001 software)
Why This Is More Important Than You Think
The visualizer accesses the Docker API from within a container
This is a common pattern: run container management tools in containers
Instead of viewing your cluster, this could take care of logging, metrics, autoscaling ...
We can run it within a service, too! We won't do it yet, but the command would look like:
  docker service create \
    --mount source=/var/run/docker.sock,type=bind,target=/var/run/docker.sock \
    --name viz --constraint node.role==manager ...
Credits: the visualization code was written by Francisco Miranda.
Mano Marks adapted it to Swarm and maintains it.
Terminate our services
Before moving on, we will remove those services
docker service rmcan accept multiple services names or IDsdocker service lscan accept the-qflagA Shell snippet a day keeps the cruft away
- Remove all services with this one liner:
docker service ls -q | xargs docker service rm